

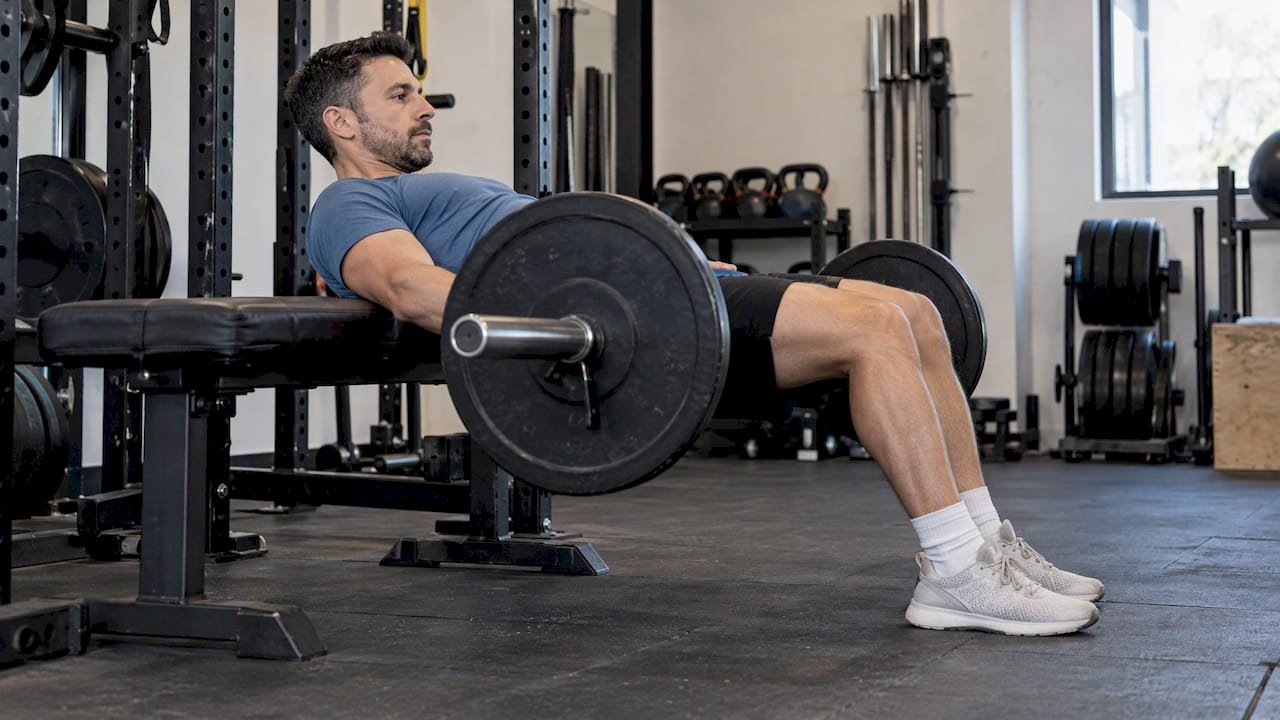
Pick the barbell hip thrust as your main lift for loaded glute hypertrophy and strength when you can set it up safely, and pick the glute bridge for activation, warm-ups, rehab, and training without equipment. Two qualifiers matter: higher muscle activation in one session does not guarantee more growth over months, and most trainees get the best results by using both.
TL;DR:
- A small EMG study of ten men found greater glute activity in barbell bridges, but another study favored thrusts; setup and knee angle affect results.
- For growth, prioritize effort and weekly volume: start with 6 to 10 hard glute sets, then build as recovery allows; EMG does not predict growth.
- A machine hip thrust offers a faster setup with similar glute activation to a barbell version, while fit and knee range can change leg involvement.
- During injury return, start with standard bridges, then add bands, single leg work, and light thrusts as symptoms and mobility allow, with clinician guidance.
Table of Contents
- What is a barbell hip thrust and how do you set it up?
- What is a glute bridge and when do you use it?
- How do barbell hip thrusts and glute bridges compare side by side?
- What does the research actually show about hip thrusts and glute bridges?
- Which exercise should you choose for your goal?
- How do you program hip thrusts and glute bridges?
- What are the most common mistakes, and how do you fix them?
- How we use hip thrusts and glute bridges in our coaching
- FAQ
- Sources
What is a barbell hip thrust and how do you set it up?
A hip thrust is a loaded, bent-leg hip extension with your upper back supported on a bench. Bret Contreras describes it as a way to increase range of motion over floor bridges and to load the glutes at short muscle lengths using a barbell, bands, or a combination. That description matches how we coach it: the bench gives you room to drop the hips below the line of the torso, so the bar travels farther on every rep.
Here is the setup we teach:
- Bench placement: Sit on the floor with your shoulder blades against the long edge of a stable bench, so the bench edge sits just below your shoulder blades.
- Bar position: Roll the bar over your legs until it rests in the crease of your hips, with your hands holding it steady.
- Padding: Wrap the bar in a thick foam pad or use a dedicated pad. Contreras notes that padding is essential for long-term adherence, because hip discomfort without it makes people quit the lift.
- Foot position: Feet roughly shoulder width, shins near vertical at the top, and ribs stacked over the pelvis.
The mechanics are what make the lift so useful for progressive loading. A biomechanical comparison found that the hip thrust produced larger concentric time, vertical displacement, total displacement, vertical positive impulse, and total impulse than the glute bridge. Put plainly, the bar moves farther and the muscles push against it for longer on each rep. That is a good recipe for stacking weight on the bar over time.
You have several ways to load the movement, and each has a place:
- Barbell: The default for heavy, measurable progression. It takes the most setup but gives the clearest way to add weight each week.
- Machine: A 2023 comparison of machine and barbell hip thrusts found similar glute activation, and participants preferred the machine for ease of use. Differences in knee range of motion explained the variations in hamstring and quadriceps activation. Machines are a strong choice when setup time or comfort is the barrier.
- Bands: Useful for adding resistance at the top or for lighter days, and a good way to teach people to push the knees out.
- Single-leg: A way to challenge each side and reduce load when a barbell feels like too much.
- “American” variation: A style of thrust some lifters used to change where the lift feels hardest. Try it as an alternative once the standard version is solid.
Logistics are the honest cost of this exercise. You need a bench, a bar, plates, and a pad, and you need time to get everything lined up. If your hips are tight or the bench feels awkward, our mobility drills for lifters help you reach a comfortable bottom position before you add weight.
Pro Tip: Set the bench against a wall or heavy rack so it cannot slide, then do one empty-bar set to check that your shins are vertical at the top before you load plates.
What is a glute bridge and when do you use it?
The glute bridge is the floor version of the same idea. You lie on your back with knees bent and feet flat, then drive your hips up until your torso and thighs form a straight line. With no bench and no bar, you can do it almost anywhere, which is a big part of its appeal.
Several variations keep it useful as you get stronger:
- Standard bridge: Both feet on the floor, hips lifted to a straight line. The easiest entry point for beginners.
- Single-leg bridge: One foot planted, the other leg extended or held up. It raises the challenge without any equipment.
- Banded bridge: A mini band above the knees cues you to press outward and feel the outer glutes working.
- Barbell glute bridge: Lie on the floor with a padded bar across the hips. The shorter range of motion lets you handle heavy loads with a simpler setup than a bench.
The mechanics explain where it fits. Because your back is on the floor, the range of motion is shorter than a hip thrust, and the hardest part of the rep often comes at lockout, when the hips are fully extended. That makes it easy to feel the glutes squeeze hard at the top, even with light weight.
Its common uses follow from that:
- Activation: A few sets before squats or deadlifts help many lifters feel their glutes before heavier work.
- Warm-ups: A couple of quick sets fit into a short warm-up with no setup.
- Physiotherapy and rehab: The low demand and simple positioning make it a common starting point when someone is returning from a lower-body injury, under the guidance of a clinician.
- Finishers: High-rep banded or single-leg bridges after your main lifts add volume without much fatigue.
- Travel-friendly programming: A hotel room floor is enough. Expert commentary reported by Muscle & Fitness makes the same point: both exercises work, so choose based on equipment, comfort, and goals, and bridges suit beginners and work with limited setups.
Treat the bridge as a tool with a clear job instead of a lesser hip thrust. In our coaching it earns a spot in almost every program, usually at the start or end of a session, and sometimes as the main glute movement for people who are new or rebuilding.
How do barbell hip thrusts and glute bridges compare side by side?
Rather than a vague “which is better,” compare them on the constraints you actually face. Here is how they stack up.
Setup and equipment
- Hip thrust: Needs a bench, bar or machine, and padding, plus time to position everything.
- Glute bridge: Needs a floor. Add a band or bar only if you want more resistance.
Range of motion and displacement
- The biomechanical comparison found larger vertical and total displacement, and larger impulse, for the hip thrust. In that study, participants worked at 80% of their one-rep max hip thrust, so the loads were heavy.
- The bridge’s shorter path is not a flaw. It is why it is easier to learn and easier to do anywhere.
Muscle activation
- This is where the data gets interesting, and where headlines mislead. In a surface EMG study of ten male participants, the barbell glute bridge produced significantly greater upper and lower gluteus maximus peak and mean activity than the barbell hip thrust, while the hip thrust produced greater vastus lateralis (a quadriceps muscle) activity.
- Another study went the other direction. A cross-sectional study that varied knee angle reported that hip thrusts produced greater gluteus maximus and erector spinae activity than bridges across the tested conditions.
- Taken together, studies disagree because setup, load, knee angle, and participants all differ. Neither exercise wins on activation in every context.
Loading ceilings and progressions
- Hip thrust: Easy to load heavily and in small steps with plates, which makes progressive overload simple to track.
- Glute bridge: Bodyweight versions hit a ceiling quickly, so you progress by going single-leg, adding bands, adding a bar, or slowing the tempo.
Foot and knee positioning
- Changing foot position changes the demand. A systematic review of gluteus maximus activation concluded that foot position significantly alters activation. The knee-angle study above also found that knee angle affects both glute and hamstring activation.
- In practice: feet farther from the hips shift work toward the hamstrings, and feet closer shift it toward the quads. Keep shins close to vertical at the top for a glute-focused rep.
Athletic transfer
- A systematic review of barbell hip thrusts found that the lift favors hip extensor activation compared with squats and that acute post-activation effects sometimes improved sprint performance, though evidence of chronic transfer is mixed.
- Treat thrusts as one piece of a sprint or power program, not a guaranteed speed booster. Bridges have far less direct evidence for athletic transfer, so we use them mainly to prepare the hips for heavier work.
The practical takeaway: hip thrusts are the better progression tool, bridges are the better access tool, and activation numbers from a single study should not decide your choice by themselves.
What does the research actually show about hip thrusts and glute bridges?
Research on these lifts is easy to misread, so it helps to separate three kinds of evidence: muscle activation (EMG), biomechanics, and long-term training outcomes.
EMG findings. The head-to-head EMG work is mixed, which is exactly why you should be cautious with any single claim.
A surface EMG study of ten male participants found that the barbell glute bridge produced significantly greater upper and lower gluteus maximus peak and mean activity than the barbell hip thrust, while the hip thrust produced greater vastus lateralis activity. That surprises people who assume the longer-range lift always lights up the glutes more.
Meanwhile, a systematic review of gluteus maximus activation concluded that the traditional barbell hip thrust is among the exercises producing very high gluteus maximus activation, above 60% of maximal voluntary isometric contraction, and that variations and foot positions change the numbers.
Biomechanics. The biomechanical comparison found that the hip thrust had larger concentric time, vertical displacement, total displacement, vertical positive impulse, and total impulse than the glute bridge. In other words, thrusts give you more distance, more time under load, and more total push per rep. That favors the hip thrust as a platform for progressive overload even when peak activation is similar or lower.
Longitudinal outcomes. Here the picture is more reassuring and more important:
- A randomized training study comparing hip thrust and back squat found similar glute hypertrophy when set volume was equated, and that acute surface EMG did not reliably predict long-term growth. It also found that hip thrusts favored hip-thrust-specific strength while squats favored thigh hypertrophy.
- A systematic review and meta-analysis on gluteus maximus hypertrophy concluded that resistance training produces moderate gluteus maximus hypertrophy overall, and that single-joint exercises such as the barbell hip thrust should be prioritized when you want to emphasize the gluteus maximus at the expense of other muscles.
What to take from all this:
- Activation is not growth. The study that found higher glute activation in bridges did not measure muscle growth. The training study showed that acute EMG did not reliably predict long-term hypertrophy.
- Volume and effort matter most. When volume is equal, different glute-focused lifts can produce similar growth, so pick the one you can load, recover from, and repeat.
- Strength is specific. You get better at the lift you practice. If you want a heavier hip thrust, do hip thrusts.
- Direct bridge-versus-thrust training trials are scarce. Most of what we know comes from comparisons with squats, plus short EMG sessions.
Caveats to keep in mind. The EMG study above used ten male participants, a small and narrow sample. Activation is measured in one session, not across months of training. Results shift with foot position and knee angle, so two studies using different setups can reach opposite conclusions without either being wrong. Treat the research as a guide to why each exercise behaves the way it does, not as a scoreboard.
Which exercise should you choose for your goal?
Use these decision rules to match the exercise to what you actually need.
Hypertrophy. Make hip thrusts your main glute movement because they are easy to load progressively and give you a long range to work through. The meta-analysis on gluteus maximus hypertrophy supports prioritizing single-joint exercises like the barbell hip thrust when glute growth is the priority. Add bridges as high-rep finishers, such as banded or single-leg sets, to collect extra volume without much fatigue.

Strength, power, and sprinting. Hip thrusts tend to be the preferred choice for horizontal force, and the barbell hip thrust review found acute performance benefits in some studies. Chronic transfer is mixed, so use them as part of a broader program that also includes squatting, hinging, and sprint work. If you want a hip hinge that complements this, Setlume’s guide to EMG-backed Romanian deadlift cues is a useful companion read.
Rehab or activation. Start with bridges. A sensible ladder looks like this:
- Standard bridge for control and awareness
- Banded bridge to teach knee position
- Single-leg bridge for side-to-side balance
- Hip thrusts with light load, then heavier load as symptoms and mobility allow
Anyone coming back from an injury should check with their clinician before progressing. If back discomfort is part of the story, our guide to lower back pain strength training explains how to keep the spine in a safe position.
Limited equipment or travel. Bridges and single-leg bridges are effective substitutes. To keep them challenging, adjust three levers:
- Volume: Go to higher reps per set.
- Tempo: Lower slowly and pause at the top.
- Leverage: Move from two legs to one, or elevate your feet slightly.
Beginners. If you are new to lifting, a few weeks of bridges build the pattern and confidence before you add a bar. Our guide to compound lifts for beginners shows how to learn the big movements in a sensible order.
Quick rules of thumb:
- No bench or bar: bridge
- Want to add weight every week: hip thrust
- Feel nothing in your glutes yet: bridge first, then thrust
- Short on time: machine hip thrust if you have access, otherwise a banded bridge finisher
- Both goals at once: thrust first, bridge last
Pro Tip: If you cannot feel your glutes during hip thrusts, reduce the load, pause at the top of each rep, and treat a set of banded bridges as your warm-up. Feeling the muscle work beats chasing a heavier bar.
How do you program hip thrusts and glute bridges?
Good programming turns the comparison into results. Below are the ranges and steps we use.
Rep and set ranges
- Strength: lower reps for multiple sets with long rests, using hip thrusts.
- Hypertrophy: moderate reps for multiple sets, hip thrusts as the main lift.
- Activation and finishers: 12 to 20 or more reps for 2 to 3 sets, mostly bridges.
A simple progression ladder
- Add load once you can complete your target reps on every set with good form.
- Increase range of motion or slow the tempo to make the same weight harder.
- Move to single-leg versions to challenge each side.
- Add pauses at the top or partial reps in the final set for extra effort.
Climb the ladder one step at a time. Changing load, tempo, and variation in the same week makes it hard to tell what worked.
Frequency and volume
- Train glutes directly regularly, allowing recovery between sessions.
- Many lifters do well starting with roughly 6 to 10 hard weekly sets for the glutes, from all exercises combined, and building from there as recovery allows.
- Watch your hamstrings and low back. If they fatigue before your glutes do, reduce the load, move your feet slightly closer, and focus on a ribs-down finish instead of arching.
Sample two-week microcycle
The plan below combines heavy thrusts with bridge-based activation. Adjust days to fit your schedule.
First week
- Day 1: Banded bridges, 2 x 15 as a warm-up. Barbell hip thrusts, 4 x 6–8. Single-leg bridges, 2 x 12 per side.
- Day 2: Squat or deadlift focus, with 2 x 12 bridges as a warm-up.
- Day 3: Barbell hip thrusts, 3 x 10–12. Banded bridge finisher, 2 x 20.
Week 2
- Day 1: Banded bridges, 2 x 15. Barbell hip thrusts, 4 x 5–7 with slightly more load. Single-leg bridges with a 2-second pause, 2 x 10 per side.
- Day 2: Squat or deadlift focus, bridges as a warm-up.
- Day 3: Machine or barbell hip thrusts for several sets in a moderate rep range. Finish with a high-rep bridge burnout.
Some practical notes for using the plan:
- Keep one or two reps in reserve on most thrust sets, and go closer to failure only on the last set.
- If you are new to structured training, our beginner’s guide to progressive strength training explains how to raise the load without piling on fatigue.
- Rest 2 to 3 minutes between heavy thrust sets, and 60 to 90 seconds between bridge sets.
- Track your top set every week. A simple log is the easiest way to see whether your glutes are actually getting stronger.
What are the most common mistakes, and how do you fix them?
Most problems with these lifts come from setup or from chasing weight too fast. Watch for these.
- Bench too high or too low: If the bench sits at your mid-back, your hips may not drop far enough and your ribs flare. Position the edge just below the shoulder blades.
- Bar too high or too low: The bar should sit in the hip crease. Too high feels like it is riding on your belly, and too low rolls toward the thighs.
- No pad: Skipping the pad leads to bruising and a sore hip crease, which is the fastest way to start avoiding the lift.
- Spine hyperextension: Finishing the rep by arching your low back instead of extending your hips. Tuck the ribs down and finish with a tall, neutral torso.
- Knees caving in: Press the knees gently out in line with your toes throughout the rep.
- Weak glute squeeze: Rushing reps without a deliberate squeeze at the top. Pause for a count of one or two and tighten the glutes hard.
- Rolling barbell: Not stabilizing the bar. Grip it firmly, keep your chin slightly tucked, and keep the bar anchored in the hip crease.
Quick fixes and drills
- Band around the knees: Cues outward knee pressure and helps you feel the outer glutes.
- Adjust your feet: If hamstrings take over, bring the feet slightly closer. If quads take over, move them slightly farther away.
- Isometric top holds: Hold the top position for 5 to 10 seconds with a light load to learn the squeeze.
- Partial range and tempo control: Slow the lowering phase and stop before the pelvis tips forward.
If your hips feel stiff at the bottom of the rep, that is usually a mobility issue, and a short drill block before your session often helps.
Pro Tip: Film a set from the side at hip height. Check that your shins are vertical, your ribs are stacked over your pelvis, and your chin stays tucked at the top of the rep. A short video can catch errors more clearly than a mirror.
How we use hip thrusts and glute bridges in our coaching
Our view is simple: the exercise matters less than how you progress it and whether you stick with it. We use hip thrusts for progressive loaded work and bridges for activation, finishers, and the days when a client’s body needs a lighter option. Both fit inside our habit-first approach, where the goal is a routine you can keep for years instead of a block you abandon in six weeks.
Many people expect the heavier lift to always be the answer. We disagree. Activation numbers from a short lab session tell you little about what will build your glutes over months, and the research on equated volume supports that. A client who does three consistent thrust sessions a week with clean form will usually beat the one chasing a personal record that wrecks their lower back over time. Consistency and honest effort are the real variables, so we choose the variation a client can repeat with control.
In practice we start with a quick check of hip mobility and how the client moves, then build up. Someone new to training might spend several weeks on bridges and banded work before touching a bar. Someone experienced might go straight to barbell thrusts with bridges as warm-ups. Recovery gets the same attention as the lifts, because glutes grow when you sleep and eat well, not just when you train.
FAQ
Why is the hip thrust machine harder?
It is not always harder. A 2023 comparison of machine and barbell hip thrusts found similar glute activation, and participants preferred the machine for ease of use. Differences in knee range of motion explained variations in hamstring and quadriceps activation, so how hard it feels depends on the machine’s fit and the load you choose.
What is the best glute exercise?
No single exercise wins for everyone. A systematic review of gluteus maximus activation placed the barbell hip thrust among the exercises with very high activation, and a meta-analysis supports prioritizing it for glute growth. Pair it with a squat or hinge pattern for a well-rounded program.
Will glute bridges grow glutes?
Yes, they can, especially for beginners or when you progress them with single-leg work, bands, a bar, or higher reps. In a surface EMG study, the barbell glute bridge produced higher gluteus maximus activity than the barbell hip thrust in that sample. Growth still depends on effort and weekly volume over time.
What is a hip thrust machine?
It is a gym machine that supports your upper back and provides a built-in loaded pad or belt across your hips, so you can perform the hip thrust without moving a barbell into position. It cuts setup time, which is why many lifters prefer it. Our membership gives you coached access to strength training in a boutique setting.
Sources
- Electromyographic differences of the gluteus maximus, gluteus medius, biceps femoris, and vastus lateralis between the barbell hip thrust and barbell glute bridge
- [Biomechanical Differences between Hip Thrust and Glute Bridge for Hip Extensors
| Cultura, Ciencia y Deporte](https://ccd.ucam.edu/index.php/revista/en/article/view/2084) - Gluteus Maximus Activation during Common Strength and Hypertrophy Exercises: A Systematic Review - PMC
No Comments.